Installing butt hinges on your doors can be a rewarding DIY project, whether you’re upgrading your home or putting the finishing touches on a handmade piece of furniture. Butt hinges, known for their durability and aesthetic appeal, are commonly used because of their ability to support a wide range of door weights and sizes. In this guide, we’ll walk you through two different methods of installing butt hinges: the mortise and non-mortise installations.
Method 1: Mortise Installation
Mortise installation is a traditional and sturdy method for fitting butt hinges. This approach is ideal for heavy doors or where a flush finish is desired. It requires precision and attention to detail but results in a professional and seamless look. Here’s a step-by-step guide to help you master the mortise installation:
1. Choose the Right Hinges and Tools

Firstly, select hinges appropriate for your door’s weight and size. Heavier doors require sturdier hinges. Tools needed include a sharp chisel, hammer, screwdriver, marking gauge, drill with bits, and a ruler or tape measure. It’s also advisable to have some sandpaper on hand for smoothing out the mortise.
2. Mark the Hinge Placement
Accurately marking where the hinges will be placed is crucial. Use a marking gauge for consistent and precise lines. The standard placement is about 10 inches from the top and bottom of the door, but this can vary based on door size. Ensure the markings are mirrored accurately on both the door and the frame.
3. Cut the Mortises
This step requires patience and precision. Use your chisel to score the outline deeply enough to guide subsequent cuts. Carefully chisel out the wood within this outline, working gradually to reach the depth equal to the thickness of the hinge plate. The goal is to create a recess where the hinge sits flush with the wood surface. Keep checking the depth as you go to ensure an even, flat base for the hinge. If the mortise is too shallow, the hinge won’t sit flush; too deep, and you’ll have a loose fit.

4. Secure the Hinges
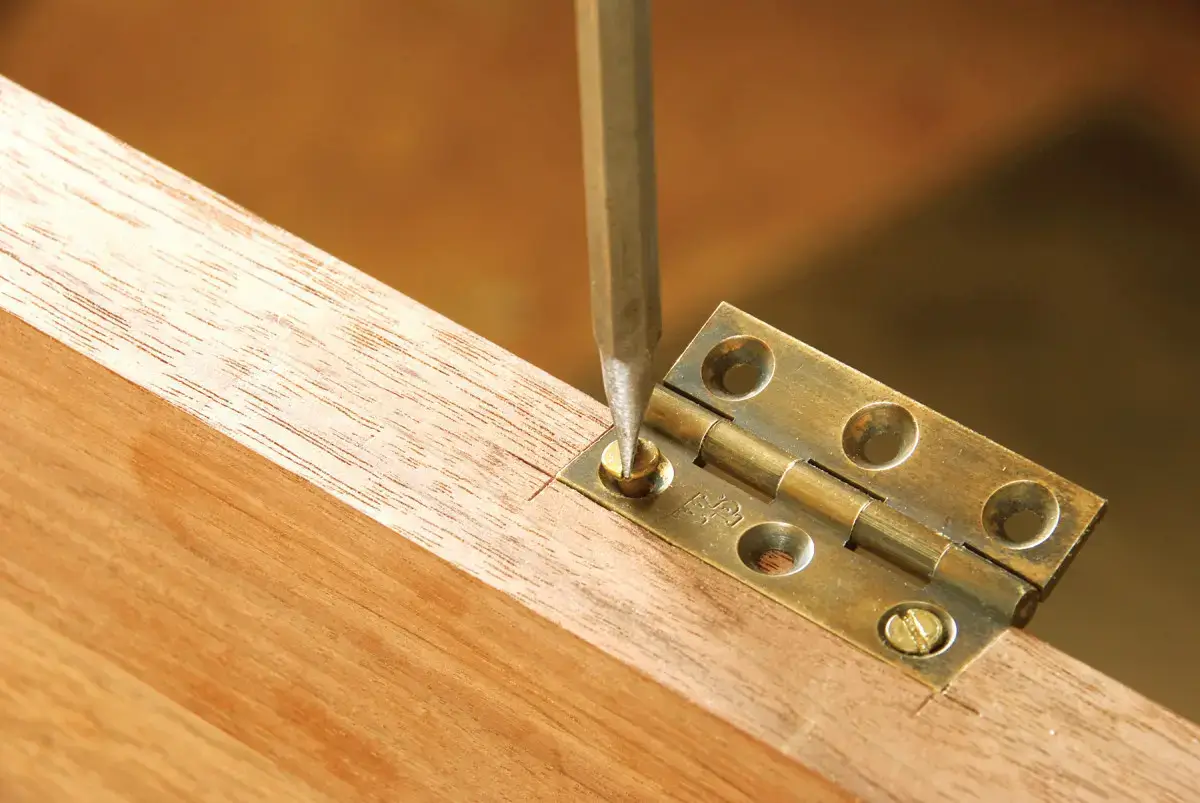
Place the hinge in the cut-out mortise. Use a pencil to mark the screw holes, ensuring the hinge is perfectly aligned. Pre-drilling the screw holes is crucial to prevent wood splitting. Use a drill bit slightly smaller than your screws for this. Once pre-drilled, align the hinge again and screw it into place. The screws should be tight, but be careful not to overtighten and strip the wood.

5. Fine-Tuning and Adjustments
Once installed, you might need to make minor adjustments. If the door doesn’t close properly or there’s a gap, recheck the alignment. Sometimes, a slight deepening of the mortise or adjusting the hinge placement can resolve these issues.
6. Finishing Touches
After the hinges are installed, open and close the door several times to ensure smooth operation. If you encounter any resistance or squeaking, a bit of lubricant on the hinge pin can help. Finally, a light sanding around the mortise area can clean up any rough edges, ensuring a neat finish.
Additional Tips
Practice Makes Perfect: If you’re new to this, practice cutting a few mortises on scrap wood first.
Sharp Tools Are Key: Ensure your chisel is sharp for cleaner, more efficient cuts.
Clean as You Go: Regularly remove the wood shavings from your work area to keep the mortise clear and visible.
Patience Pays Off: Rushing the job can lead to mistakes. Take your time for the best results.
Method 2: Non-Mortise Installation
Non-mortise hinge installation offers a simpler and quicker method compared to mortise installation, making it a popular choice for DIY enthusiasts, particularly when working with lighter doors or in situations where a less invasive installation is preferred. Here’s a detailed guide to ensure a successful non-mortise hinge installation:
1. Select Suitable Hinges and Tools
Choosing the right non-mortise hinges is crucial. These hinges come in various sizes and finishes, so select ones that match the weight of your door and your aesthetic preferences. For the installation, you will need a screwdriver, a drill with a small bit for pilot holes, a tape measure, and a pencil for marking.
2. Mark the Hinge Placement

Accuracy in placement is key. Begin by measuring the door and frame to determine the appropriate position for the hinges. A common approach is to place them 5 to 7 inches from the top and bottom of the door. Use a tape measure and a pencil to mark the spot on both the door and the frame where each hinge will be attached. It’s vital that these marks align perfectly to ensure the door hangs straight.
3. Align the Hinges and Mark Screw Holes
Position the hinge on your marks and use a pencil to lightly mark where the screws will go. Make sure the hinge is perfectly aligned with the edge of the door and frame for a clean fit. This step is important to ensure that the hinge plates sit flat against the surface, allowing the door to operate smoothly.
4. Drill Pilot Holes
Drill small pilot holes at each screw mark. This helps prevent the wood from splitting when you insert the screws and ensures that the screws can be driven in straight. Be careful not to drill too deeply; the pilot holes should be just deep enough to accommodate the length of the screws.
5. Attach the Hinges
With the pilot holes drilled, align the hinge back onto the door and frame and start screwing it in place. It’s usually best to partially screw in all the screws first to allow for minor adjustments, then fully tighten them once everything is properly aligned.
6. Check Alignment and Adjust as Needed
Once the hinges are attached, carefully open and close the door several times to check for smooth operation. If you notice any sticking or misalignment, slightly loosen the screws, adjust the position of the hinge, and then retighten. This step may require a bit of trial and error to get perfect alignment.
7. Consider Additional Support for Heavier Doors
If you are working with a door that is on the heavier side for non-mortise hinges, consider using three hinges instead of two for added support. This can distribute the weight more evenly and prevent the door from sagging over time.
Additional Tips
Patience and Precision: Take your time with each step to ensure precision. Even small errors in alignment can result in a door that doesn’t close properly.
Quality of Hinges: Invest in high-quality hinges to ensure durability and smooth operation.
Regular Maintenance: Periodically check the hinges for looseness or wear and tighten or replace as needed to maintain optimal performance.
Final Tips and Considerations
1. Measure Twice, Cut Once
This principle is especially crucial in hinge installation. The accuracy of your measurements directly affects the door’s alignment and its ability to close properly. Before making any cuts or drilling any holes, double-check your measurements. Remember, it’s not just about the distance between the hinges, but also their depth and alignment relative to the door frame. Inaccurate measurements can lead to doors that stick, swing improperly, or have uneven gaps around the edges. Using a digital caliper can add an extra layer of precision to your measurements, ensuring that every cut and drill is exactly where it needs to be.
2. Choose the Right Hinge for the Job
Understanding the differences between hinge types is key. Mortise hinges, while requiring more effort to install, offer greater stability and support, making them ideal for heavier doors or high-traffic areas. Non-mortise hinges, on the other hand, are a good choice for lightweight interior doors or projects where you want a quicker installation without sacrificing aesthetics. Also, consider the material and finish of the hinges; they should not only complement the door and the room’s design but also be suitable for the door’s material and environmental conditions (like humidity or temperature changes).
3. Maintenance
Regular maintenance of hinges extends their life and keeps doors functioning smoothly. Beyond tightening screws, it’s important to check for any signs of wear or corrosion, especially in environments with high moisture or salt air. Applying a lubricant to the hinge pin can prevent squeaking and ensure smooth movement. Also, if paint or varnish is part of your door’s finish, be careful to keep the hinges clean during application, as these substances can hinder the hinge’s movement if they get inside the mechanism.

4. Safety First
Using the right protective gear cannot be overstated. Eye protection is essential when drilling or chiseling, as wood chips and metal filings can cause serious injury. Gloves can protect your hands from sharp edges and splinters. Also, ensure your work area is well-lit and free from clutter to avoid accidents. When using power tools, make sure you are familiar with their operation and safety features. Always disconnect power tools when changing bits or blades, and never leave them unattended.
5. Overall Impact
Successfully installing butt hinges enhances not just the functionality of your doors but also contributes to the overall aesthetic and feel of your space. Doors that open and close smoothly with well-fitted hinges add a subtle but significant touch of professionalism and care to your environment. With attention to detail, the right tools, and a bit of patience, this project is not just about utility but also about the satisfaction that comes from accomplishing a task with precision and skill.
Conclusion
Both methods have their advantages. The chisel and hammer approach is great for those who prefer manual control and have fewer tools. The router method is quicker and provides a cleaner, more uniform result. Choose the method that suits your comfort level and the tools at your disposal.
Remember, patience and precision are key. Take your time with each step to ensure a clean, professional finish. With these techniques, you’ll have your butt hinges installed seamlessly, ensuring a perfectly swinging door or a smoothly closing cabinet.


